Saturday, September 3, 2011
New things
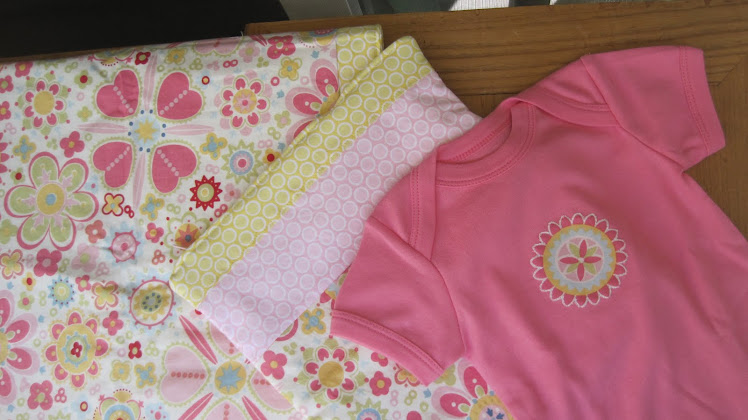
This set is made from 100% Organic fabric and is incredibly soft!
I've put some great new things in the Etsy shop recently and still have a bunch more that will be in the shop soon, check back later for more! Soon to come a great new tutorial for the wall! : )
Giveaway!
Check out the great giveaway! Amy at Nap Time Crafters is hosting my giveaway valued at $95!
Go on over to http://www.naptimecrafters.blogspot.com to enter!
Good luck! : )
* Giveaway closed, please try the next one!*
Go on over to http://www.naptimecrafters.blogspot.com to enter!
Good luck! : )
* Giveaway closed, please try the next one!*
How To Make a Crib Rail Cover tutorial
Materials: fabric, batting, rotary knife, cutting mat, velcro, pins, and sewing machine.
I chose fabric that was similar to the other crib rail cover we have. And since we have a crib rail cover for the front of the crib and we needed one for the side, this tutorial is for a side crib rail cover. But, whether you are doing the front or the side of the crib, it really doesn't matter, you will just have to adjust the measurements accordingly. So, after measuring the rail you will be making the cover for, cut two pieces of fabric and one piece of batting, all exactly the same size. For example, for our crib's side rail, I cut the fabric and batting to 27 x 18 inches.
Next, cut fabric for the straps. I cut five strips of 6 x 4 inches. You may want to measure the slats on the crib to see how many you may need and what spacing would be ideal for your crib.
Cut the velcro into four inch strips.
Next lay the fronts of the fabric together on top of the batting.
Pin the batting and fabric together along all four sides, leaving a space open for turning it right side out.
Sew along the sides and when you get to the last side remember to leave the space open to flip it right side out.
Once you flip it right side out and straighten the fabric out and push the corners out as much as possible, the next step is to sew along the edge for a clean look. I like to sew fairly close to the edge, as you can see in the next photo. I always start sewing just up from the opening, and if it helps you could pin it closed so you don't have to hold it as you sew.
A nice clean edge!
At this point you can move on to the straps. Fold the first piece of fabric over so the front of the fabric is on the inside and sew along the edge and the top so that one end is closed. When you're done turn it inside out, and then sew along the edge on each side and top end to flatten the strap and make nice clean edges. I always sew the side with the seam first and then the other side.
Next step is placing the velcro on the strap and sewing it on. The easiest thing is to have bought velcro that has adhesive sides so that you can just stick it on and not have to worry about pinning the velcro. Sew all four sides of the velcro on to the strap.
Fold over the end of the strap and pin it to keep it in place.
Next thing you want to do is figure out the spacing from one strap to the other, I chose four inches for mine.
And sew them on to the rail cover. I like to sew in two places, along the edge of the fold and then along the edge of the rail cover.
Then sew the other side of the velcro on, just as you did with the straps, and make sure each piece of velcro you put on the rail cover side matches up with where the straps will fold up to.
All done! : )
Thursday, September 1, 2011
Guest Blogger - Amy from Nap Time Crafters
Hi I'm Amy from Nap Time Crafters!
Make sure you stop by my pattern shop for lots more fun!
Do you have a lil' chair hanging out in your house in need of a BIG facelift???
Kids LOVE those little foam chairs, but the covers get so gross. ewww...
Or maybe you have a little princess in your house and the hand-me-down Buzz Lightyear chair isn't doing it for her:)
Let's give it a whole new life!
It didn't take long at all to recover (1 naptime- promise!) and Little Miss absolutely adores her chair! She reads in it, snacks in it, watches a bit of Winnie the Pooh in it...
I decided to go with a nice neutral fabric that keeps our family room looking like somewhat of an adult space rather than kid world:) And now any little boys down the line can use it too
If you're feeling ambitious you could even start from scratch! If you go that route buy your foam as a foam pad (you know the cheapo kind for bunking guest on) NOT as yardage at craft store- you'll save lots:)
Let's get started!
Materials:
- Lil' Chair: I found mine at a thirft store for $3! It's the Marshmallow brand I think
- Fabric: It took 2 thrifted pillowcases to recover this size (so about 2 yards)
- Tot:)
Here's a look at the before... You can't quite see since Little Miss insisted on sitting in it, but it was pretty gross. And I'm not a big fan of pink faux fur in our front room...
1. Take off the cover and cut it apart at the seam lines. Save the bottom panel and zipper. Lay out all of the pieces on your fabric and cut around leaving a small seam allowance around all sides.
2. Sew the 2 back pieces together- the chair has a seam right down the middle back and then the "flaps" wrap around to both sides.
3. Sew the seat piece to each side- it will cover the arm rests and the seat. At this point I put it over the chair to see how the fit was coming along.
4. Sew the top piece to the back piece along the long edge and the 2 short sides.
5. Sew the seat back to the back piece (step 2) seat piece (step 3), and the top piece (step 4).
6. Once you have the fit all good to go sew on the front piece.
7. Sew the bottom panel and zipper to the finished cover, put it on your chair and you're good to go! You can change the color of the bottom panel if you want, but I decided it wasn't worth the effort. You'll definitely want to keep the zipper so you can wash the cover every so often.
Enjoy your new "old" chair!
Thanks Shawn!

Saturday, August 27, 2011
How to re-upholster a stool cushion tutorial
These are the materials you'll need for this project: a stool or chair with a cushion, upholstery fabric, a rotary knife, a cutting mat, and a stapler.
Place the cushion on the fabric and measure how much you'll need to cover it and have enough to reach around the sides. It should be several inches since you want to make sure the staples (or anything under the new fabric) will not show when you flip it over. Then cut out the measured piece.
Now you'll want to bring up one side of the fabric without pulling it too much and staple along the back of the cushion about every two to three inches or so, making sure the fabric is laying flat.
When you get to the corner you'll want to fold the fabric a few times like wrapping a present. Pull the fabric slightly, but not too much, as you go so the fabric lays as flat as possible. And put a few staples in to keep it in place. Note that as you proceed to each side you'll want to make sure you are pulling the fabric just enough to keep it taught but not too much as to distort the image or stripes or whatever your fabric is.
Once you've stapled around all the sides and corners except the last corner, it should look like this. The last corner is the toughest.
You'll have two parts of the fabric to work with, one side lay down, pulling at it a bit to keep it taught, and staple. The next part do the same but really try to make it lay as flat as possible.
It should look like this when you are putting in the final staples.
And this is how it should turn out! I know, too easy! : )
Friday, August 19, 2011
Giveaway coming up!
I've got a GREAT giveaway coming up soon, it's almost finished!! I'll give you a hint... it is something similar to what you have seen on my blog recently, and it is something you could put things in : ) I know that was easy, you've probably guessed it already! I will post a picture soon! And keep in mind, if you don't win, you can always put in an order for something similar or whatever and I can whip one up! I hope you are having a great day! : )
Tuesday, August 9, 2011
This is a bag I made as a gift a few days ago. I really like making bags out of upholstery fabric but they are usually much smaller. I think it turned out pretty neat, the picture really isn't as good as the real thing. After I took the picture I decided to put a couple of nice wooden buttons on it as well. I'm thinking larger over night bags might be a nice thing to make in the future?!
Friday, August 5, 2011
Thursday, August 4, 2011
This is a comforter cover and set of two pillow cases, along with curtains you can see on the right side. I made this set for my son but I will soon be offering custom sets for sale. I haven't worked out all the details yet about the custom order process. I might just put this set on Etsy as an example and allow people to place orders through "conversation" on Etsy. I made this set after looking around at various stores and feeling unsatisfied with the choices out there. I thought if people already had a theme, like we did, it would allow them to add a great, creative element to their child's room. I can make the sets in all cotton fabric, Organic cotton fabric, or any combination with or without minky or chenille. In addition to comforter covers, pillow cases, and curtains, I also make fabric wall hangings. Which I will post an example of soon. Please let me know if you have any feedback! Thanks! : )
Subscribe to:
Posts (Atom)
sold
About Me
- TulipsAndTurnips
- My name is Shawn and I am a stay at home Mom of two boys and also a student. After many years of school and a Master's degree in Psychology, I decided to go back to school for Lactation Consulting. I spend most of my time with my children, and working on my sewing projects. Currently the sewing projects have to due with my little side business of making things for babies, which will be the main focus of this blog. I also love spending time with my husband but I see him very little now because he is busy with work and paramedic training. We have been together ten years now and married five! I love making things for special people in my life, I feel like it's something I can do to stay connected and maybe they will think of me when they see the blanket, pillow, curtain, or whatever else I have made. Since I am a somewhat introverted kind of person sewing seems to fit me, it's a way to express myself creatively, and put love into each piece, for each person. My life is quite challenging at times but I make sure to think about things I am grateful for each day.